
.png)
.png)
Too little stock loses sales. Too much stock ties up cash. For most Shopify stores, the right move is to set safety stock by SKU and location, then use it to build a reorder point.
Here’s the short answer:
- Safety stock is backup inventory for demand spikes and supplier delays
- Reorder point is when you place the next PO
- A simple formula is: Reorder Point = (Average Daily Sales × Lead Time) + Safety Stock
- Stockouts can cost about 3% of annual revenue
- Holding inventory often costs about 20%–30% of average inventory value per year
If I were setting this up, I’d keep it simple:
- Use a days-of-supply buffer for steady SKUs
- Use the max-minus-average formula when demand or lead time swings
- Use a statistical formula for high-volume or high-priority items
- Review top SKUs before Q4, Black Friday, and after supplier delays
- Track everything at the variant and location level
A fast-moving SKU in Nevada should not use the same buffer as a slow mover in New Jersey. And if a product was out of stock for 10 days, I would not count those days when calculating average daily sales.
Here’s the fastest way to think about it:
| Method | Best For | Core Idea |
|---|---|---|
| Days of supply | Steady or new SKUs | Hold a set number of days of backup stock |
| Max minus average | SKUs with spikes or late shipments | Cover the gap between normal and worst-case demand |
| Statistical | High-volume or high-priority SKUs | Use service level, demand variation, and lead time |
The goal is simple: hold enough units to avoid missed sales, without parking too much money on the shelf.
How to Fix Stockouts and Overselling with Safety Stock #ecommerce #shopify #business

sbb-itb-f0fc809
What Data You Need Before Calculating Safety Stock
These inputs turn a rough buffer into a safety stock number you can actually use. Pull them by SKU and by location.
Sales velocity, lead time, demand swings, and seasonality
Average daily sales gives you the baseline number of units a SKU sells each day. Calculate it by dividing units sold by the number of days in your selected window, usually 30, 60, or 90 days. If a product was out of stock for 10 of those 30 days, use 20 as the denominator, not 30. Otherwise, your average comes out too low.
Lead time is the gap between placing a purchase order and having stock ready to sell. In practice, actual lead time is often longer than the shipping quote because processing, receiving, and QC add extra days. The clean way to track it is simple: record the date you place each purchase order and the date the inventory becomes available for sale.
Demand variability shows how uneven daily sales are. You can measure it by checking the maximum daily sales in your history or by calculating the standard deviation of daily demand. One tells you how high demand can spike. The other shows how jumpy demand is day to day.
For seasonal products, compare the same period year over year so planned demand lines up with patterns you already know are coming.
How to pull usable data by SKU and location
Use Shopify Analytics’ Sales by day report, not inventory level reports. Inventory reports show what’s on hand, while sales-by-day data shows sell-through velocity. Export the report to CSV and calculate average and maximum daily sales at the variant level. That matters because different sizes or colors of the same product often move at different speeds.
For lead time, Shopify doesn’t track supplier lead times natively. You’ll need to log the purchase order date and the date inventory becomes stock-available by hand across at least three order cycles. That gives you enough history to estimate both the average and the worst case.
Pull every metric by SKU and by location. Lead time can vary a lot from one site to another, like 5 days at a domestic warehouse versus 30 days at an overseas facility. If you lump all locations together, you can miss the fact that one warehouse is close to empty while another is sitting on too much stock.
Use this checklist to match each metric to the right source:
| Data Input | Where to Pull It | Why It Matters |
|---|---|---|
| Avg. Daily Sales | Shopify Analytics → Sales by Day | Sets baseline depletion rate |
| Max Daily Sales | 90-day historical peak by SKU | Covers spikes and promotions |
| Avg. Lead Time | PO creation date → stock-available date | Sizes the replenishment gap |
| Max Lead Time | Historical worst-case delivery | Protects against delays |
| Demand Std. Deviation | STDEV() on daily unit sales |
Measures actual demand volatility |
| Stockout History | Days out of stock | Prevents artificially low demand averages |
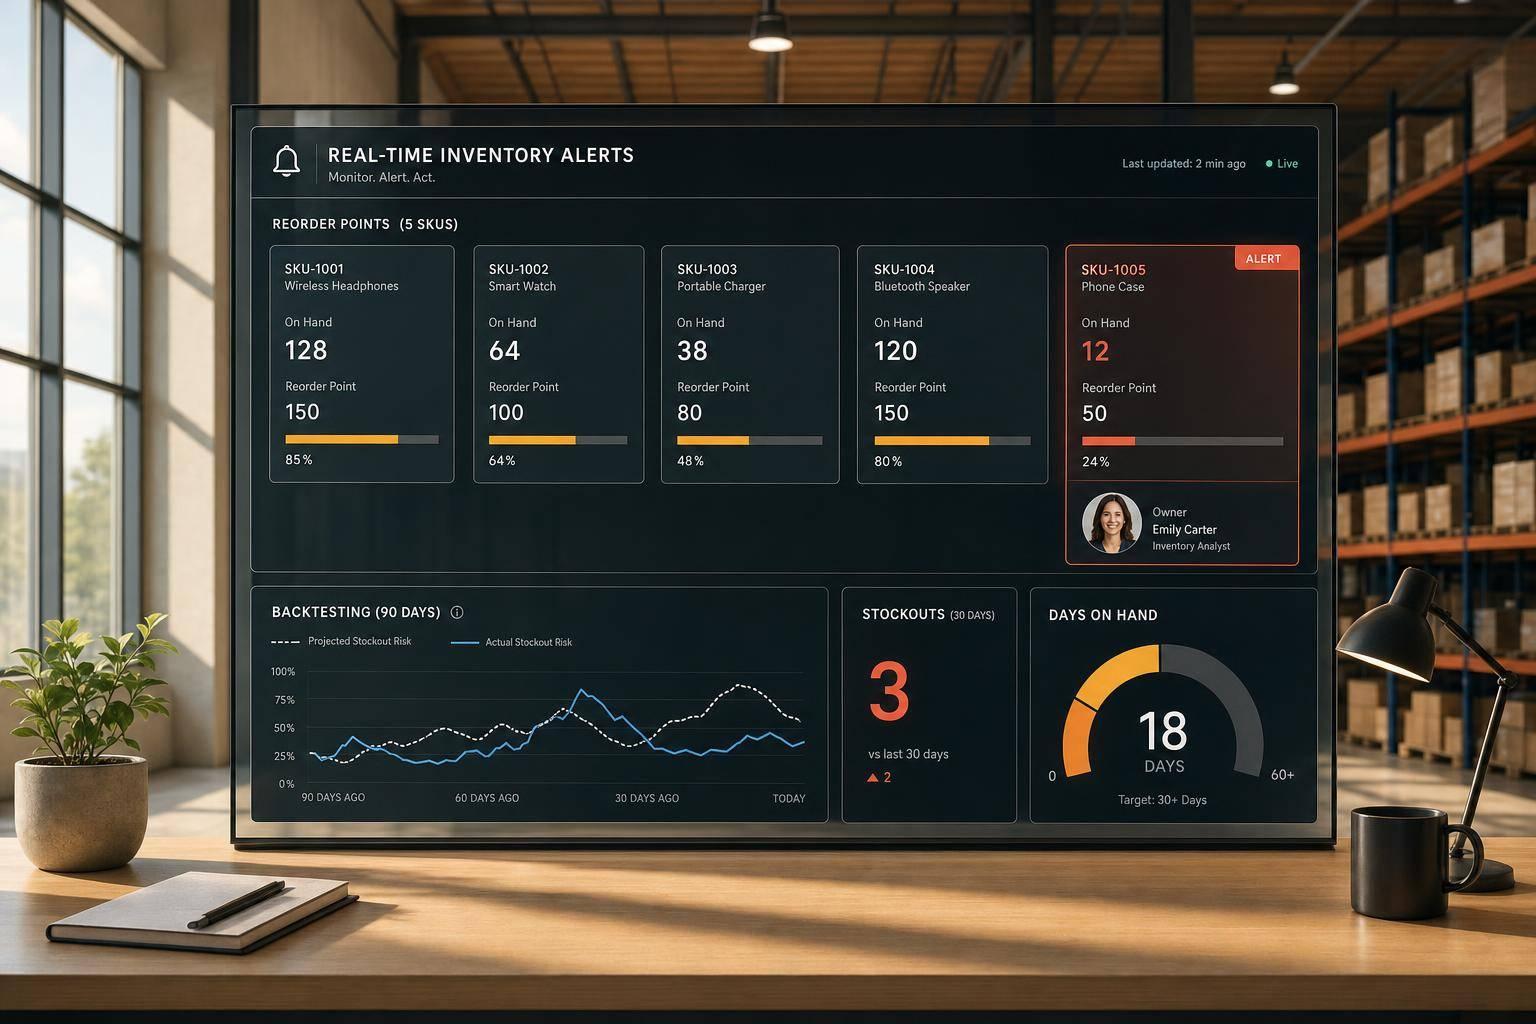
How Forstock helps organize your data

Forstock puts SKU-level sales velocity, lead times, forecasting inputs, and multi-location inventory data into one dashboard. Once those inputs are in one place, calculating safety stock gets a lot easier with simple formulas.
How to Calculate Safety Stock for Shopify SKUs

Safety Stock Methods for Shopify: Which Formula Should You Use?
Once you have clean SKU-level sales data and lead-time data, the next step is simple: pick the formula that matches how that SKU behaves.
Some SKUs are steady and easy to forecast. Others bounce around, run hot during promos, or depend on suppliers with shaky delivery times. That’s why there isn’t just one way to calculate safety stock.
Method 1: Simple rules of thumb for stable SKUs
The easiest method is days of inventory. You take average daily sales and multiply that by a set number of days.
As a starting point, a dependable domestic supplier often calls for 5–7 days of stock. An overseas supplier shipping by ocean freight may need 14–21 days.
Another common shortcut is to set safety stock at 50% of demand during lead time. Here’s what that looks like in plain terms: if a SKU sells 10 units per day and the supplier needs 10 days to deliver, lead-time demand is 100 units. In that case, your safety stock target would be 50 units.
Use this approach when you don’t have much history or when demand is very steady. It fits new SKUs, stable products, and slow movers with low stockout risk well. The downside is pretty clear: once demand gets seasonal, lead times start drifting, or the SKU brings in a lot of revenue, these shortcuts can miss the mark.
Method 2: The maximum-minus-average formula
This method is a solid step up from rough rules.
The formula is:
Safety stock = (Maximum Daily Sales × Maximum Lead Time) − (Average Daily Sales × Average Lead Time)
It gives you coverage for two problems at once: a jump in demand and a late shipment.
Here’s a simple example. Say a product usually sells 20 units per day, but during a promotion it hit 35 units per day. Your supplier normally delivers in 10 days, but one shipment took 16 days because of a delay.
- Maximum scenario: 35 × 16 = 560 units
- Average scenario: 20 × 10 = 200 units
- Safety stock = 360 units
This method makes sense when you want a bigger cushion and you have enough past data to spot high points.
Method 3: Statistical safety stock for higher service levels
For high-volume SKUs, long lead times, or items where a stockout hurts more, a statistical formula is usually the better fit.
Safety stock = Z × standard deviation of daily demand × √lead time in days
The Z-score sets your target service level. A 95% service level uses 1.65, while a 99% service level uses 2.33.
| Service Level | Z-Score | What It Means |
|---|---|---|
| 90% | 1.28 | In stock 9 out of 10 cycles |
| 95% | 1.65 | In stock 19 out of 20 cycles |
| 99% | 2.33 | In stock 99 out of 100 cycles |
Higher service levels reduce stockouts but increase buffer stock.
This method often uses less cash than the worst-case formula because it plans for likely variation, not the absolute worst case.
For example, if the standard deviation of daily demand is 5 units and lead time is 10 days, then at a 95% service level the math looks like this:
1.65 × 5 × √10 = about 26 units
That’s a lot leaner than a heavy worst-case buffer, which is why this method is often a better fit for important SKUs with enough history behind them.
You can also pair this with ABC analysis. Set 95–99% service levels for A items and 85–90% for C items, so your key SKUs get more protection without tying up too much cash. Then use that safety stock number to set each SKU’s reorder point to reduce stockouts.
How to Set Reorder Points and Use Safety Stock Day to Day
Calculate safety stock by SKU, then build your reorder point
Once you’ve set safety stock, the next step is simple: turn it into a reorder trigger.
Use this formula: Reorder Point = (Average Daily Sales × Lead Time in Days) + Safety Stock
Here’s what that looks like in practice. If a product sells 15 units per day, your supplier takes 12 days to get you from purchase order to sellable stock, and your safety stock is 30 units, your reorder point is:
(15 × 12) + 30 = 210 units
That means you place a new order when inventory drops to 210 units.
One detail matters a lot here: use total lead time, not just the shipping estimate. That includes:
- order processing
- production
- transit
- receiving and QC
In many cases, total lead time ends up 30% to 50% longer than the supplier’s transit quote. Also, store safety stock as a unit count, not a dollar amount. That way, you can add it straight to lead-time demand and set a clean, usable trigger.
Then run the same math for each location. One fulfillment node can look fine on paper while another is about to run dry.
Set different buffers for each warehouse, store, or 3PL
Different locations need different buffers because demand and lead time change from place to place. A warehouse in Nevada may move stock at one pace, while a 3PL in New Jersey sees a very different pattern.
Set separate values for each warehouse, store, or 3PL using that location’s own sales velocity and actual lead time. In plain terms, each site should stand on its own numbers. If one location is sitting on extra safety stock, you can shift it to another location that is already hitting its reorder point.
That gets a lot easier when all reorder points sit in one live view instead of being scattered across tabs and files.
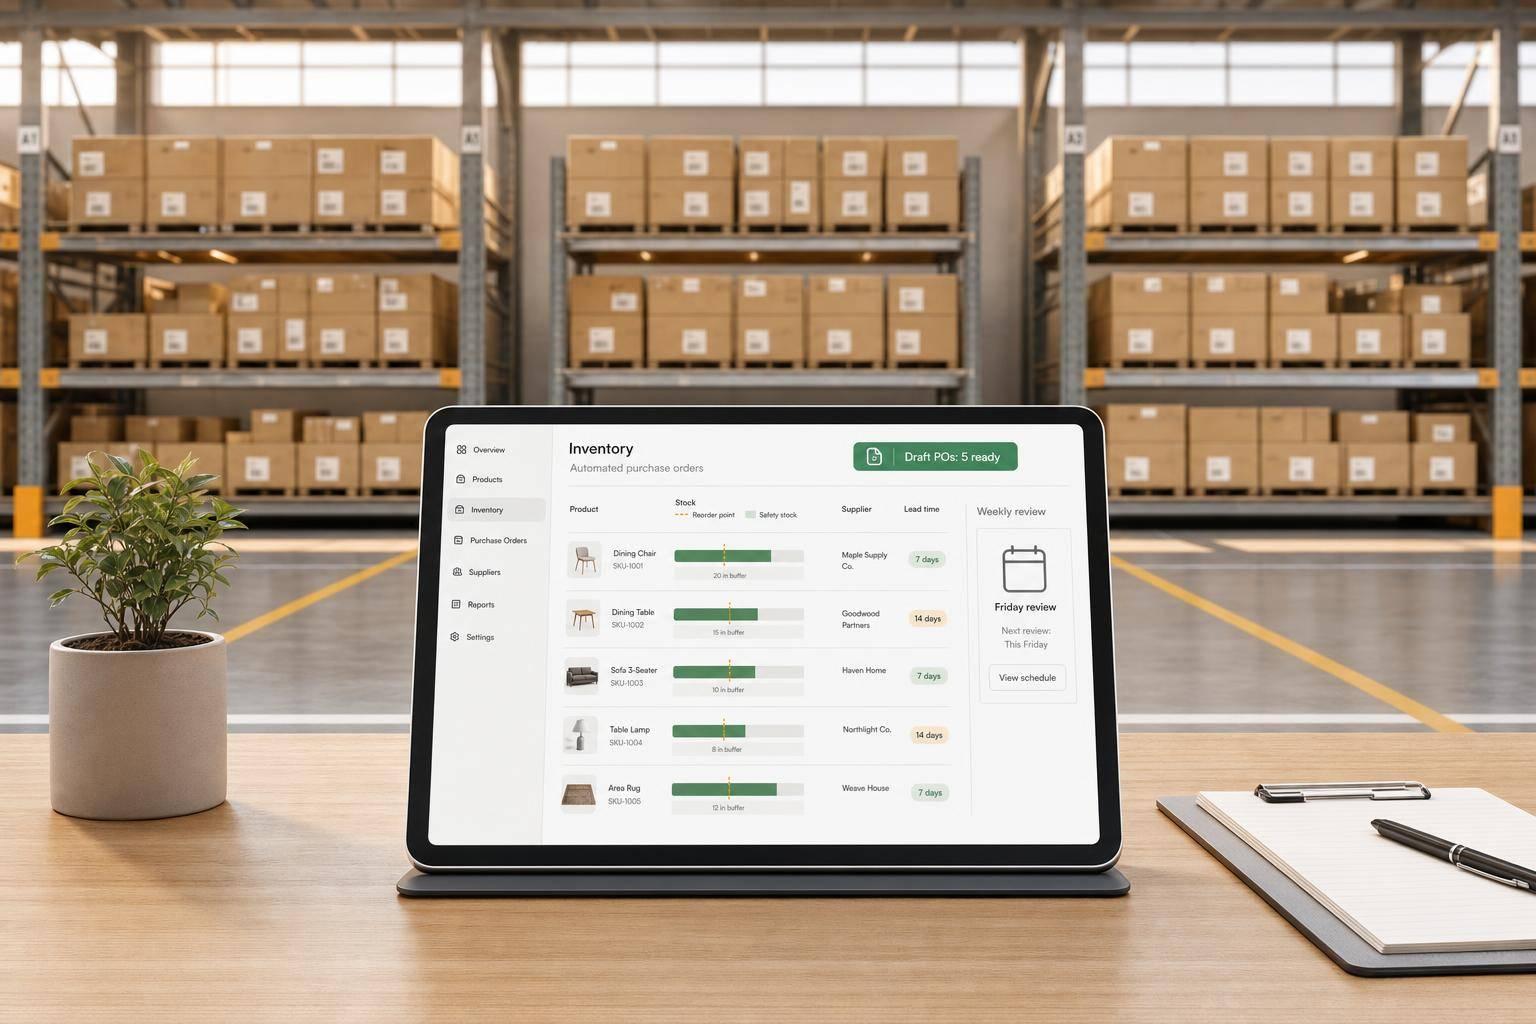
Use Forstock to automate reorder suggestions and purchase orders
This is where manual vs. automated purchase orders becomes a critical distinction as manual tracking starts to crack. Once you’re juggling lots of SKUs across multiple locations, spreadsheets can turn into a mess fast.
Forstock connects directly to Shopify and keeps a live inventory view across your stores, warehouses, and 3PLs. Its Inventory Table shows safety stock, days of supply, and estimated stockout date, so you can spot which SKUs need attention before they run out.
When a SKU gets close to its reorder point, Forstock generates reorder suggestions based on live sales rate and lead time. From there, you can turn that suggestion into a purchase order with one click.
How to Adjust Safety Stock Without Tying Up Too Much Cash
Weigh stockout risk against carrying cost
Once your reorder points are set, often by improving reorder point accuracy with AI, the next step is keeping your buffers lean.
Safety stock costs money. But stockouts usually cost more. The easiest way to look at that tradeoff is at the SKU level.
| Factor | Lower Safety Stock | Higher Safety Stock |
|---|---|---|
| Stockout Risk | High; vulnerable to demand spikes or late deliveries | Low; protected against most variability |
| Cash Tied Up | Low; maximizes working capital | High; capital is locked in physical goods |
| Storage Needs | Minimal; lower warehouse fees | Significant; higher warehouse costs |
| Customer Satisfaction | Risky; potential for "out of stock" messages | High; consistent availability builds loyalty |
| Management Effort | High; requires constant monitoring and emergency orders | Low; provides a comfortable window for reordering |
ABC segmentation helps keep this practical instead of turning it into a full-time job. Review A items more often, B items on a regular schedule, and C items only when demand changes.
Update safety stock for seasonal demand and supplier changes
Buffers should move when demand or lead time moves. If those inputs change and your safety stock doesn't, you're flying blind.
Before Q4, Black Friday, or back-to-school, bump up buffers on your fastest-moving SKUs. When the rush ends, cut them back down fast so you don't keep paying to store inventory you no longer need.
Supplier changes matter just as much. If a supplier's lead time moves from 14 days to 21 days, your safety stock should change right away. A good rule of thumb is to base your buffer on the average delay you've actually seen from that supplier, not the number they promised. So if they're usually 5 days late, add a 5-day safety buffer on top of your standard calculation.
A quarterly audit of your top 50 SKUs is a good baseline. For high-revenue "A" items, monthly reviews are worth it.
Conclusion: Key rules to follow
A few rules tend to hold up across stores and product lines:
- Safety stock is SKU- and location-specific. One number for your whole catalog will always be off somewhere.
- Simple methods work for stable SKUs. Statistical formulas make more sense when demand is less predictable.
- Regular review protects revenue without tying up extra cash. Put a schedule in place and stick with it, especially before peak seasons and after supplier changes.
The goal is to hold enough - no more, no less.
FAQs
How often should I update safety stock levels?
Safety stock isn’t something you set once and walk away from. You need to review it on a regular basis because demand shifts, lead times move, and supplier performance can change.
Update your safety stock levels when you change suppliers, notice repeated stockouts, or keep ending up with too much inventory. It also helps to review those levels before peak seasons like Q4, when sales patterns can look very different from the rest of the year.
For your top-performing SKUs, check them at least every 90 days. That way, your buffer stays in line with current sales velocity and how well your suppliers are delivering.
What if I don't have enough history for a new SKU?
If you don't have much sales history for a new SKU, use estimates until the data starts to fill in. A safe place to start is a conservative buffer, like 7–14 days of inventory, or a simple fixed buffer such as a 3–5-day supply.
Once you have at least 60–90 days of sales data, you can set a more precise level. After that, review and adjust it at least once per quarter as you get a better read on demand and supplier lead times.
Should I include inbound inventory in my reorder point?
Yes. Base your reorder point on available inventory, not just your on-hand total.
Available inventory includes the stock you have now plus inbound units that are already on order and expected to arrive.
That distinction matters more than it sounds. If you look only at on-hand stock and ignore incoming shipments, your reorder trigger can fire too early. And when that happens, you can end up with extra stock sitting on the shelf before you need it.

.png)
.png)
.png)
.svg)